Monday, 31 October 2011

Seats

Seats?!  I am a long way off needing seats for this bike.  But I did need to remove them in order to investigate the state of the body/cowl (which surprisingly isn't too bad!)

I don't need to say much about the seats - the pictures say it all.   Everything needs repairing


3 points of interest;
1.  Who was the idiot who thought that 2 copper plumbing brackets would suffice as a repair for the front seat hinge?  And how did the original steel hinge get broken in the first place?
2.  What is that reference plate screwed to the underside of the drivers seat?  Is this a Manurhin reference? I don't think so, but it looks like its been placed there with purpose.
3.  Those foam cushions look to be original..... but have they been in a fire?  they look/feel/smell charred.

 Oh how I wish inanimate objects could talk

Wobble of confidence

I felt really low about this project over the weekend.  This really is a hopeless case.  Every part of the bike is buggered, and it really isn't worth the effort to try and fix - it certainly isn't worth the financial cost.

I enjoyed working on the engine.  That seemed like a worthy challenge - to try and bring the heart of a machine back to life.  And once I had it up and running I was rather keen to see if I could put it into the frame and fix up some wheels and see it I could get it moving.
I managed to control my disappointment last week when I realised that my rear wheel was not original and needed replacing, and I pressed on with preparing other parts.  However, there are only so many knock-backs a man can take

I had turned my attention to the front wheel and stripped the hub and brake assembly (which to this point I hadn't looked at closely) and as I removed the Huret speedo worm drive and found it to be smashed, my heart sunk and for the first time I questioned whether it was all worth while.  There must be a point where a smart man would cut his losses and move on to more valuable things to do with his time and energy.

I didn't know wether to laugh or cry.
I walked away from it all for a while and went and did some gardening chores..... but eventually (inevitably?) I was drawn back to the garage.
Deep breath.
Press on.


I'm still not really sure about this project.  I am fast exceeding my budget, and if I am going to have to replace every little part that some bodger in the past has fucked up then I will simply grind to a financial halt.  I love tinkering in the garage, and so for this reason I shall continue to do what I can - but whatever I do, this project is certainly not a "restoration" - at most it will only ever a "resuscitation" - anything else simply isn't worth it.

Steering Lock

steering lock - removing cross pin and clip
The Manurhin has a lock on the steering column - not for an ignition as might first appear (there is no ignition security key on a Manurhin) - its a steering lock.  Allegedly there should also be a lock on the drivers seat to restrict access to the petrol tank - but I don't appear to have one of these.

Obviously, my scooter doesn't have a key for the steering lock.  But fortunately the lock is not in the engaged position so the steering turns freely.
As I have been preparing the frame for powder-coating, getting the lock mechanism out seemed sensible even though I could probably get away with simply masking it off and leaving it in place.  Trouble is, its a real bugger to get out without a key.  I should have just left it, but it started to niggle me and I felt driven to investigate (especially as I wasn't prepared to spend what one locksmith quoted me to get it removed and fitted with a new key... £130!).  Over the period of several days I kept returning to this little puzzle wondering what on earth could be keeping it from sliding out.

Fellow Manurhin owner Roy had already told me about his own experience with removing his steering lock which resulted in drilling it out.  I was keen to avoid such destruction but was grateful to learn however that the lock is German-made by Neiman.  You can buy Neiman locks on eBay (though I cant find one to my exact dimensions) so I did a google search for "How to remove a Neiman lock", and turned up a couple of forums discussing this very problem (it seems I'm not the only person to have bought an old motorcycle with no keys)  Sadly though these discussions don't answer the problem completely so I was still in the dark as to how it operated.

marking where the restriction is.
Note there is no external pin or fitting here
The lock is very small; a mere 12mm diameter brass barrel and bolt, and it simply slides in a steel tube welded to the headstock of the scooter frame.  After removing a spring clip and a cross pin, I could slide the lock assembly laterally back and forth within the tube by about 6mm, but there was a dead stop that was preventing the barrel from removing fully.  Investigating with magnifying glass and mirrors down the headstock provided no clue as to what might hold the barrel in place - there was no obvious retention or lip.

To prove its free movement to myself I cut a long 3mm wide strip of Guinness beer can and carefully slid it between the brass barrel and the steel retaining tube.  I was able to push this thin strip all the way along the tube until I could see it pop out in the headstock tube - there was nothing in its way.  Withdrawing the strip, and repeating the process around the complete circumference of the lock barrel I was to discover that there was one place where (at about 1 O'clock) where the strip hit a restriction.


drilled out outer tube, and internal pin
The thing that puzzled me was that I could find no external evidence of a retaining pin and as the steel outer tube was no more than maybe 2mm thick, there surely wasn't going to be a stepped ridge.  However, I was now very intrigued, and as much as I didn't want to do anything destructive, I decided to drill a 5mm dia hole into the tube at the place where I had deduced the restriction to be.

Sure enough, drilling a hole in the external tube at this point revealed a pin in the brass barrel that once removed (drilled with a 2mm drill) allowed the barrel to slide easily out of the outer tube.

Once out, all became clear.
This is an incredibly simple design.  Simple but ingenious.
Once again, my assumptions about the engineering principles let me down; I had assumed that the outer tube was 1. simply a carrier or support for the lock mechanism - I would never have guessed that it was actually part of the lock mechanism, and 2. it was too small and skinny a piece of tube to have any integral machining done to it.

note the 2 grooves machined inside
A closer inspection inside this steel tube reveals that the inside wall has two machined grooves in it (remembering that this tube is 12mm ID with 2mm thick wall - this is an intricate bit of machining) and it is these grooves that the pin in the brass barrel/bolt engages with.
[apologies for the poor quality of photo - taken through a magnifying glass with flash - but hopefully you get the idea]

So I had settled my curiosity, and I can now send the frame off for powder-coating without fear of damaging the lock....... what a shame I damaged it by removing it :-(
I dont think I have done anything irreparable to the frame - though I am reluctant to weld that drill hole up now as this would certainly ruin the internal grooves.  Even with this hole, If I find a replacement barrel/bolt, it should still operate properly.

perhaps this hole can simply become a jolly big greasing point.


Just in case anyone is ever after a replacement steering lock.....


Thursday, 27 October 2011

Paint colour

I am sure that thinking about paint colours at this stage of this project is a bit like trying to choose the name of your rock-band before you have your first rehearsal (How many times have I done that in my youth?! :-)

However, while I've been working on the chassis I have become curious about the paint colour.
According to documentation, the Manurhin Scooter was technologically advanced for its time, and not least for its production paint.
According (I know this is a tenuous link of accordings) to wikipedia; "According to Bonhams the MR 75 “was constructed to a high standard and must have been one of the first motorcycles to be painted electrostatically, a process commonly known as ‘powder coating’.


I've used powder-coating many times,  most recently on my Vespa PX, and in my experience its very hard wearing and provides a nice thick even coat without need for priming and undercoating (as is necessary in conventional wet cellulose spraying)  And its for this reason that I've started to become suspicious of what paint is on my scooter and therefore what the original colour might have been


Up until now I have unquestionably believed that the colour of my bike was "Maroon" - I understood this to be a standard production colour.  A 'Motor Cycling with Scooter Weekly" magazine review of the "Manurhin 'Hobby de Luxe'"in December 1959 states;
"Colours available; Choice of red or Blue for de Luxe model;  Green only for standard model"


I had assumed that my 'Maroon' was the same thing as their 'Red', but I have certainly seen more pillar-box red examples of Manurhins, so I may be mistaken in my assumption.
I think I would be right in saying that in general, pale blue and pale green are certainly original colours, but there are a good number of examples of red, maroon and pale yellow Manurhins out there.  This is not the first example of model confusion that I've talked about in the Manurhin/DKW scooters, I'm starting to get used to the ambiguity now.


flaking paint on mudguard suggest a respray
But back to my scooter;  the paint on the chassis (and body) is maroon, but is has an undercoat of what I was seeing as pale yellow.  Maybe early powder-coating techniques required a 'primer' of sorts?  Or has my bike been repainted at some stage?  The external body has certainly had some respray work - this is evident in flakey paint in places - but never the less, this respray has tried to be faithful to a colour underneath.
The thing that troubles me is that if my chassis has been repainted then whoever did it, did a bloody good job because the maroon paint over the yellow has got into every nook and cranny of every component (would you really be bothered to paint the underside of the rubber suspension cups?) - its as if the maroon colour has been put on by dipping, or electrostatically painting.  Has it been repainted or is the maroon-over-yellow a production process?


what is this colour under the maroon?
what is the colour? and what is it doing here?


So, I investigated further by literally scratching away at the surface.  When I expose a large patch of the yellow under-colour and compare this to a pure white, I cant help but ask myself - is this yellow actually a pale green?  Was my bike originally the beautiful pale green of the 'standard model' - check out the pictures of these two bikes in what I am assuming to be true reproductions of original colours 


I'm rather confused about the whole thing.  However, I have decided that I am certainly going to have the chassis and associated under-body components powder-coated in gloss black (in my opinion, chassis' should always be black.  And black is cheaper to have powder coated than colour)
As for the body colour..... I have plenty of time to think this through :-)


Wednesday, 26 October 2011

Rear wheel

Crikey, will the problems ever stop?  I shouldn't be surprised really, nothing is ever straight forward on this scooter.
I've had a niggling suspicion for a while that my rear wheel was not as it should be, and now that I am starting to work on the chassis,  I will be needing wheels shortly to stand it on.  So I dug the wheels out of the shed.


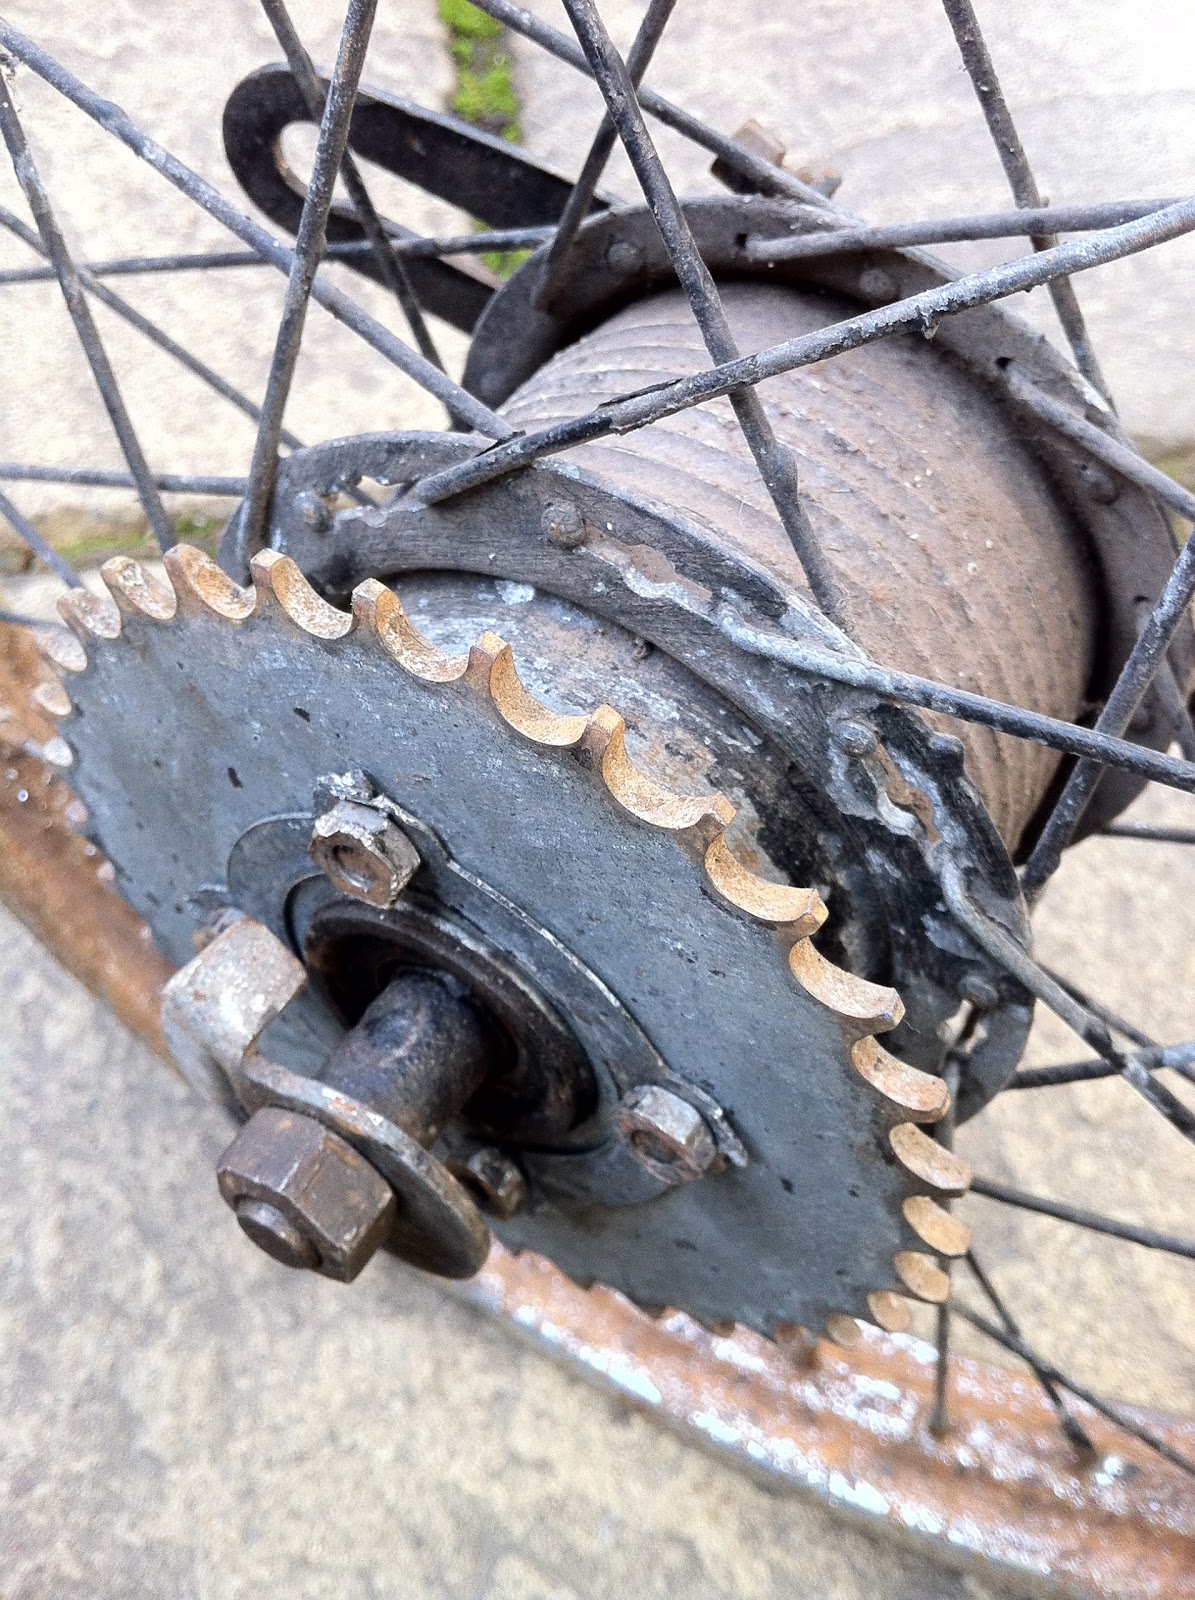
Right from the beginning, I couldn't understand why the brake lever was on the opposite side of the hub to the chain sprocket - drawings showed them both on the same side of the wheel.

Now that I look more closely at my wheel, I see that it is totally different to what was designed (according to the parts manual)


In addition, I notice that the designed chain sprocket (they call this the 'chain crown' in the parts manual) has 56 teeth - my wheel has 32 teeth.  Cripes! with a ratio like that my scooter must have run like a rocket!  Perhaps my scooter had been make into a special racer?

The more I look at it, the more I think this is not the original wheel.  I wonder what it came off? and why would anyone change it anyway?


At one stage I thought I might try and work with it (and fit a larger sprocket) but on closer inspection, I see its actually rusted through at the rim - I don't mind trying a bit of tricky welding, but I don't fancy risking a wheel failure, and so it looks as if I am in the market for a replacement rear wheel :-(


Now as chance would have it, I do happen to have a spare rear wheel hub and set of spokes (I bought these ages ago in a bundle of parts from a chap in France)  So if push comes to shove, I could try and re-spoke a new rim..... but I'd still be in need of sprocket and brake assembly.

So I guess its fingers crossed now to find a complete rear wheel assembly.

Sunday, 16 October 2011

Beltomatic safety switch logic

I think I've assembled, fitted and wired up the safety switch correctly.  And I can see the logic in how this switch works, but I don't think my logic matches with the logic of the owners manual.

My logic;
At rest, set the switch lever to touch the pulley so that the switch is open.
As the engine speeds up, the pulley moves away from the switch lever, and in doing so, the microswitch 'makes' (grounds to earth) effectively stopping the engine and letting the pulley slow down and come back out again to the switch, 'breaking' the earth and allowing the engine to start again


Owner manual logic;
At rest there should be a 3mm gap between the switch lever and pulley.  That means the switch is 'made' (earthed).  As the pulley speeds up so it draws away from the switch lever - in this way, as the pulley only ever pulls away from the switch lever, it never actually touches the switch??!!

For a detailed 'official' description (I assume its official, but I dont know where it was published) of how this switch is designed to work take a look at this document on the Manurhin Scooter Interest Group website.  My interpretation of what I read is exactly as I describe in my logic above.... but I just cant see how the switch works in their setup.

The bottom line is that I think the switch lever should be touching the pulley when at rest.  The guide wants a 3mm gap.  What am I not understanding?

I am sure that I have got something wrong - I dont doubt that, and I look forward to someone making it all clear for me

Starting the engine

I went to a scooter fair this morning in the hope that I might find that elusive bit of ducting that goes over the cylinder head.  It was a wasted trip.  Although the event was massive, it was a complete "Lambrespa" fest.  Other than a completely knackered Zundapp Bella, there was not an unusual scooter bit to be seen.
So I dashed home determined to take one more step toward bringing a rare machine back to the world.

Now my engine is all mounted up on a test bench, it seemed only sensible to see if I could start her.  I cobbled up a little fuel reservoir, and gave it a yank.
Doh!  I yanked too hard and promptly yanked the starter rope right out.  Boy, was I mad with myself.  I obviously hadn't swaged the end-cap on the wire tight enough.  Grrr, It wasn't a difficult job to do first time round, but it was a pain in the ass this time round as I would rather have been trying to start the engine.

Finally I was ready.  Would it run?
Would it run!?  First bloody pull!!  :-)))


She stalled a couple of times, but restarted ok.  There was heaps of white smoke (but I had purposely made an oil rich mix).  Eventually however it refused to start.  The carb was flooded and the cylinder soaking in fuel - I'm guessing the carb float is sticking, but who cares right now? She starts!  And that is quite amazing when you consider its been made up of a load of different parts that have never worked together before.
I wonder when the last time was that this engine ran? its got to be at least 30 years ago.  I am so amazed (and quietly delighted ;-)