Saturday, 18 February 2012

Engine air-duct

A very obvious missing part from my engine is the air ducting that fits over the cylinder head and directs the cooling air flow blown by the magneto/flywheel.  Obvious as it is, not having it doesn't actually stop you from running the engine and so when I was working to get the engine started, I didn't really worry about it - and as I say, it didn't stop me from getting the engine fired up.

However, having seen the video of me running the engine, a fellow Manurhin owner, Francois, in France warned me that because of the poor cooling design of the engine, you should always run the engine with the "complete air-intake and starter casing", or else the engine can over heat and seize.

Since then, Ive been playing with the idea of either sourcing an original one or fabricating my own.  I've seen them come up now and again on eBay and Leboncoin.fr, but with an eye on my budget I decided that I'd make one to see me right until I was rich enough to buy an original one one-day.


So armed with 3 photos of an original duct, some cardboard, and a roll of masking tape I went about mocking up a pattern.  Generally speaking, its a pretty simple cone that bolts to the starter case;  pretty simple that is until you get to the shaping required to avoid fouling the carburetor.  It wasn't long before I was getting a bit frustrated with tight internal bends and I wondered if it might actually be a better idea to bite the bullet, spend some cash and buy the real thing.  So there and then, in the garage, I got onto eBay (what? you don't have wifi in your garage??) and found the chap selling a duct in Germany.  His was a little beaten up but at £20, not a bad price I thought.  I was just about to click to buy when I saw the message "Item does not ship to GB"!  What?  What's GB done to deserve this mean snub?


Well that was it - The challenge was on.  I would have a duct in spite of someone refusing to sell me one.


 A few hours later, I was the proud (?) owner of a good-enough air duct.  It should certainly see me good to start with, and with a quick powder-coat, shouldn't look too silly either

Wednesday, 15 February 2012

Oh Bugger - again

I am always on the lookout for Manurhin parts (there are a lot of missing parts that still need sourcing for my bike), and one way of doing this is by setting a global 'saved search' on eBay for 'Manurhin'.  Once I've filtered out all the hits for revolvers, CNC machines and meat processing machines, I sometimes get lucky and find an item or two of interest.
Sometimes I even see a complete Scooter come up for sale too.  And now and then they are actually in the UK!  But rarely (if ever) do you see a Manurhin Scooter come up for sale in the UK at a bargain price - So I was rather excited to see one come up at a starting price of £100.

The chance of such a bargain seemed to cloud my better judgement.  I didn't seem to pay much attention to the sellers clear description "Manurhin hobby scooter believed to be 1960 some parts missing engine runs fine body in fair condition no v5 requires some tlc" and nor did I look too closely at his 3 blurry photographs.  I was simply motivated by a bargain price [On reflection, I have realised that I can no longer moan at my wife for her ridiculous behaviour of buying shoes she doesn't need simply because they were 'such a good price']

To cut a long story short.  Bidding began on this Manurhin and a fellow Manurhin-renovating friend of mine suggested that we bid for it together as there might be bits we could both salvage off it.  Brilliant.  I started to bid with a vengeance. And we 'won'.  We were now the proud owners of "some parts missing... body in fair, condition no v5, requires some tlc" for the bargain price of £120.21
I was very excited (and I still hadn't looked at those blurry photos properly)

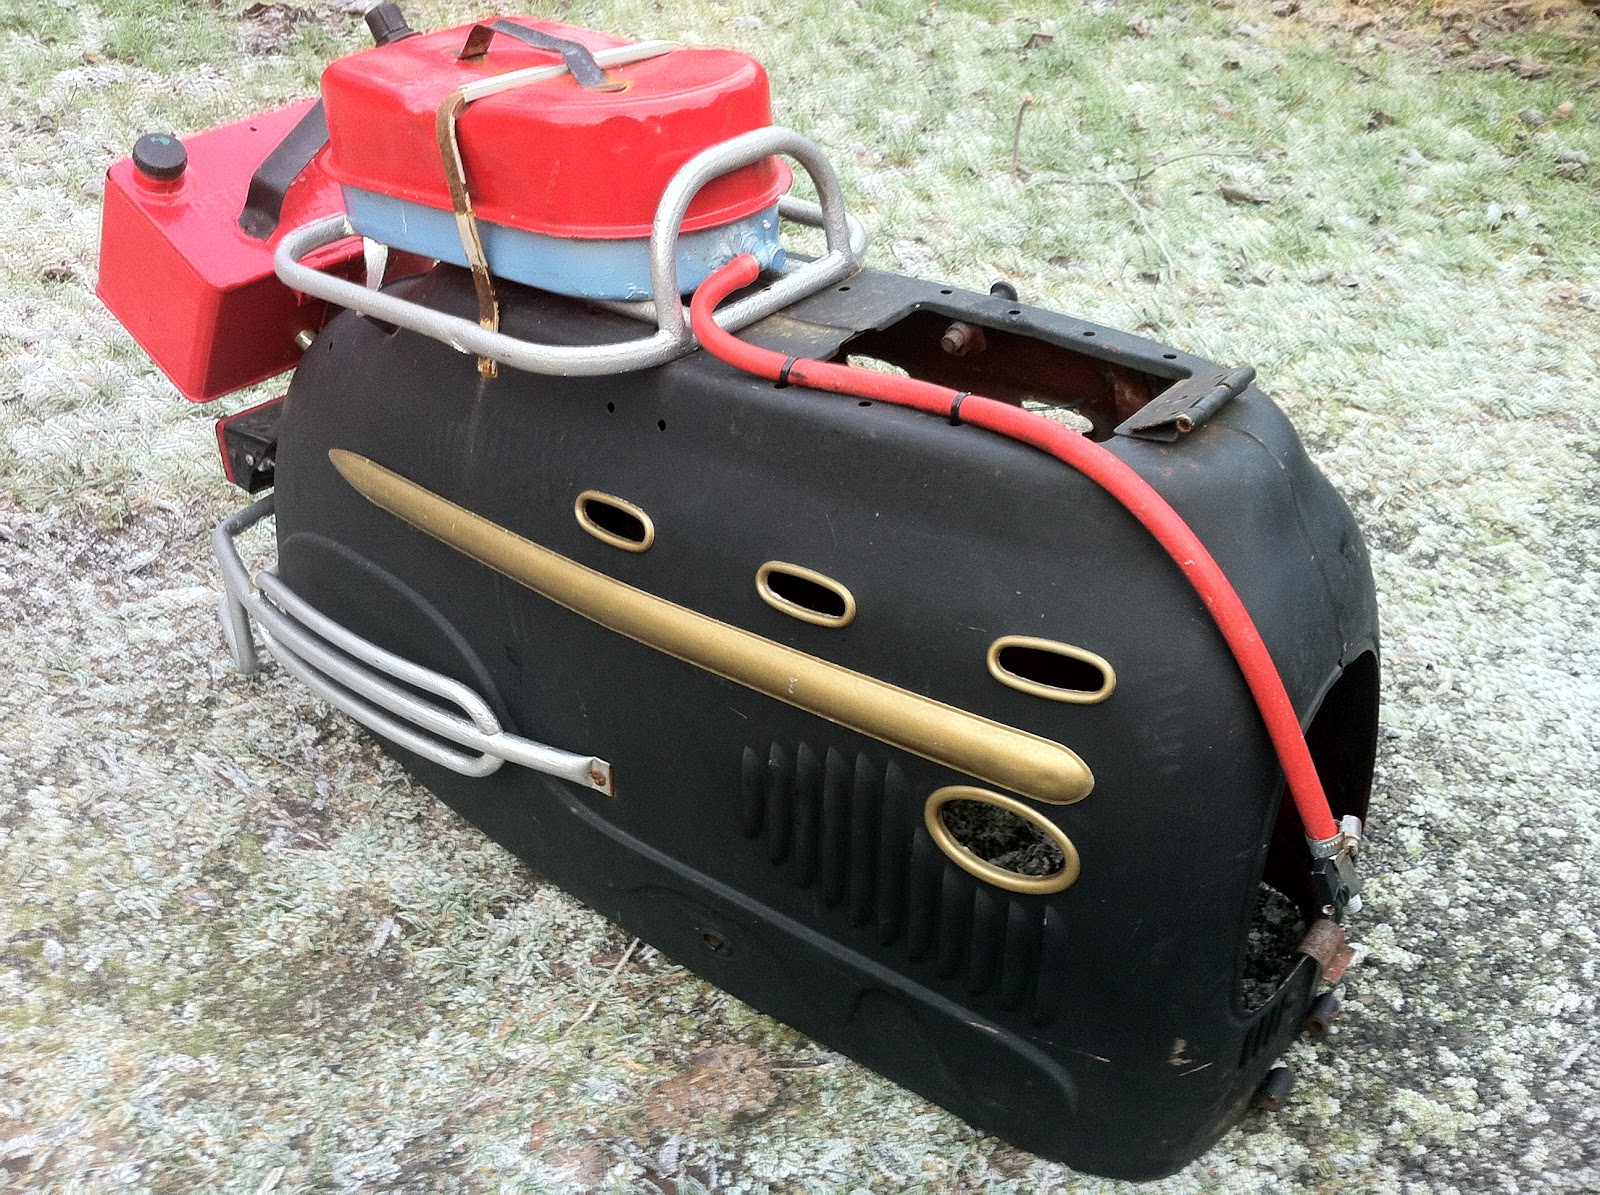
I took a van down to collect the Scooter.  I arrived in the dark.  The seller was a nice chap; Into scooters, and had come across this one as part of a trade-in (he had no history of this bike and was selling it now because he "wasn't into large scooter wheels" - in his mind scooters should all have Vespa like 10 inchers).  He was into stock-car racing and so had originally fancied it as a matt black slick thing - I wasn't concerned about the colour, but the external petrol tank modification seemed a bit odd.  As we loaded it into the back of the van, and I noticed that the wheels and handlebars weren't original, my heart began to sink.

Despite there being no starter mechanism, the seller claimed that he last started it with the aid of an electric power drill, and went on to inform me that if i ran with if fast enough I could bump start it! hmm!
There were still a couple of parts on this basket-case that I and my friend could still make use of, so I handed over the cash, and as the cheery seller waved me goodbye he (genuinely I think) claimed "You've got a lot for your money there mate!"  hmm!

So when I got home I parked the new addition to my garage up in the corner and tried to forget about it.  Mainly to forget my embarrassment for being so foolish in not either walking away from it, or negotiating a price more reflective of its worth.

A few weeks have passed now, and I don't feel so bad about myself and so I went and did a 'stock-take' of useful / valuable parts.  After my friend and I have taken the bits we both want, I think we are left with a little collection of eBayable bits that might just about claw back our 'investment';

  • Aluminum footrests
  • Leg-shield "Hobby" badge
  • Huret speedo
  • Frame and rear suspension
  • Some body panels
  • Floor rubbers
  • A bunch of ancillaries (that sometimes come up individually on eBay at quite high prices)
So Ive learnt some interesting lessons out of this experience;
  1. Irrational spending isn't just a 'shoe' thing
  2. There is no such thing as a 'bargain'
  3. One mans "Requires some TLC" is another mans "Sleepless nights"
  4. People don't take blurry photos for no reason
But that all said;   It might have been a heap of crap, but I still felt amazingly excited to have another motorbike in the back of my van :-)

Monday, 13 February 2012

How to register an old scooter

My bike was found in a barn stripped of all its registration identification - a suspected victim of number-plate trading.  I should be thankful I suppose that the frame number and engine number still existed - I've heard of people grinding those off as well.
So how do I go about getting it verified as an original motorcycle and applicable for an age-related number-plate?

Old Bike Mart ("The autojumble in your armchair") has a fascinating column called "Unearthed" in which motor historian Mike Worthington-Williams helps readers research the origin of their strange and unusual rusty old motorbikes.  I emailed Mike a while back and asked if he might be able to help with the authentication of my scooter.  It took me a little while to get round to it, but in the end I collated 16 pages of 'evidence' that I could send to Mike that might help him verify that my scooter is indeed original and give it an official age.

Mike is the Chairman Emeritus of the Society of Automotive Historians in Britain (UK Chapter),  so I guess if anyone knows, Mike knows.  His service costs a very reasonable £30, and he can turn a response round in 24 hours!
And so last week I received from Mike an official (recognised by the DVLA) dating certificate for my Manurhin scooter.  I was rather pleased.  My scooter is now officially recognised as a 1958 model.

But now what?  How do I apply for a registration number?  Well Mikes service also includes a step by step guide to the application process.  In essence;
1.  Sign a V55/5 (Mike had filled this all in for me)
2.  Get the bike MOT'd and insured. [and this is the bit that surprised me - I can get the scooter MOT'd and insured by using the frame number as the VIN number]
3.  Fix an appointment with your local Vehicle Registration Office.  Take along all your documents, including the dating certificate, and they will issue an age-related registration number (for a fee of £55)

Sweet.  As simple as that.  So all ive got to to do is get the bike on the road and to an MOT center....... hmm not quite so simple.

Sunday, 12 February 2012

Handlebars and chroming

It comes to something when your mind starts wander to the blingy bits.  Who would have thought 8 months ago when I took on this basket-case that I'd ever get round to thinking about chrome!

My handlebars are pretty tatty.  The chrome is long gone and at some time they've been painted with silver paint.  And now the rust is coming through.  Of all the bits on this bike, the handlebars probably need the least functional rework.  I could put them straight back on the bike as they are and they would work perfectly well as they were designed...... but something in me makes me think they need to look good too.
And so I went in search of a polisher and chromer.

20 years ago, I worked in a business that used a lot of polishers and chromers. There were at least 3 companies I used to work with that were within 5 miles of my house.  I set off to say hello to them again.  But I should have guessed; a lot of change has happened in Birmingham in the last 20 years, and the companies I used to know are no longer there.... not even the buildings!  In their place now are shops, apartments, and building developments for "the creative industry".  The face of Birmingham is changing rapidly.  Gone is the heavy industrial heritage, welcome the clean & tidy "creative industry"

And so I opened my search out a little wider and thankfully Dudley and the black-country are still hanging in there with their traditional industrial skills.
I phoned a couple of platers and without even seeing my handlebars they reckoned about 60 quid!  But someone suggested I go and see Castle Chromers (right close to the castle in Dudley).  From what I saw of their unit, they certainly looked like they knew what they were doing (lots of classic car parts around the place)
I showed them my handlebars (and I also had my headlamp bezel with me too).  Without hesitation, the response was £60.  I tried to bargain with them but no joy.  On reflection I suppose its about a right sort of price by the time you've paid a man for a couple of hours work - but sadly its well out of my budget - especially on a non essential job.  But before I left the fella at Castle Chrome said "why not just buy a new handlebar?"

"Ridiculous" I mumbled as I drove away.  "This handlebar is 60 years old.  You cant buy a new one".  As I drove home I happened to drive past Streetbike (not best know for its vintage parts).  I'm not sure why I stopped, but I did.  I felt a bit foolish walking in past all the superbikes and monster machines with my rusty 7/8" scooter handlebar.  I dropped it on their spare parts counter and they pointed me to a rack of anodized coloured bars - not really what I was looking for.  But then from behind the counter, one of the chaps bought out a chromed handle bar that looked remarkably like mine.  Pretty much the same angles and rise - just a couple of inches wider (which I rather like)...... and they were £25.  It was a no-brainer really.  I could keep my original bars for when I was rich enough to get them renovated, but in the meantime I could have some shiny bars for 25 quid.  As for the headlamp bezel, I can think on that for a while

Sunday, 15 January 2012

building up the chassis

This weekend has been ear-marked in my diary for many weeks. Two days to myself with no interruptions (other than the occasional running of family here and there).  A good lump of time therefore to make significant progress.

This was the first time that I've had chance to look properly at the parts that I had powder-coated before Christmas - Unwrapping a newly powder-coated machine part is not a dissimilar experience to unpacking your new iPhone - it is a moment of excitement and wonder.  I unwrapped 3 parts; the main frame, the rear swinging arm and the front forks - and decided that I should put them all together.

Rebuilding the front forks is quite fiddly - theres a lot of springs going on in there and I had to resort to a sash cramp to hold things in place while I screwed the end-stops into the fork tubes.
Fitting the rear swing arm and rubber suspension bumpers to the frame was pretty simple and non-eventful.
Fitting the front forks to the frame however was more hassle than I expected.  First of all, the manual refers to all sorts of "compensation washers" in the assembly that I simply didnt have in the original parts that I had.  Was this because they were never fitted in the first place or because someone had incorrectly serviced the bike in the past?  I could only reassemble with the bits I had to hand but I tried to understand the logic of the assembly and be content with the way I was putting it all back together.
Holding loose ball-bearings together while assembling forks is always tricky but packing them into a good bed of grease helps - I also used a bungey-cord to hold the fork assembly in place while I fitted the top bearing nut.  And talking of that top nut - why was it SO tight to screw down?  I had it on and off many times to investigate why it felt so tight - it wasn't cross-threaded, and there was no thread damage or contamination - it was just bloody tight!


All in all a satisfying weekend with a real sense of progress

Saturday, 14 January 2012

Servicing the Wheels

I had thought initially that my new wheels were is such great condition (well they are by comparison to the wheels that came with my bike) that I would simply put them on the scooter as-is in order to get the machine up and running (and then overhaul them at a later date).  However on closer inspection a couple of bearings were shot and so i decided to replace them all.  All 5 bearings! 2 on the front wheel and 3 on the back (despite the fact that the spares manual only actually identifies 2 of them - it does illustrate 3)

As an aside here I was surprised / appalled to see that someone somewhere sometime had had need to whack (a lot) the rear wheel hub with a hammer.  I wonder why?    This meant that the lip of the bearing housing was damaged and I had to file and linish the lip out in order to create a clear exit for the bearing.

As always, removing the bearings wasn't as easy as I'd hoped.  I had no cross-section drawing of the wheel hubs, so I wasn't quite sure what it was that held them in the right location other than a number of "interior" and "exterior" "stays" (overly complicated machined spacer tubes).  It turns out that each bearing is pressed home to a lip, so driving the bearing through to extract it is not an option.  I turned to google to ask "How to extract a bearing from a blind hole" and I wasn't keen on either of the three most common suggestions;
1.  Weld a bead to the race
2.  Force it out with hydraulic pressure of a grease gun
3.  Buy a blind hole bearing puller
So in the end I thought I'd see if I could pull them out with a Rawl-Bolt.  And with a little bit of heat here and there, I was delighted to find that the bearings came out without any fuss at all.

I bought new bearings for about £3 a piece.  I opted for shielded (zz) bearings as some of the extracted ones were shielded one-side and there are no grease points down there in that quite harsh environment of splashing puddles and road grit

And so on to fitting the new bearings.
I am a big fan of freezing bearings to contract them before fitting so an overnight stay next to the frozen peas and oven chips was in order.
A little propane gas on the hubs to give them a little expansion and the bearings just dropped home (encouraged with a hammer) - simple

I was a little worried still about the state of some of the spokes - some of them appeared very loose and had certainly suffered at the hand of whoever it was that had beaten the rear hub with a hammer.  It crossed my mind a number of times to maybe bite the bullet and get the wheels in for a professional overhaul, paint and re-spoke.  However, when I inspected the spokes a little closer, it appeared that they were serviceable and I could simply tighten the loose spokes - I even attempted to 'tune' them to the same tension - I'm not sure I've done a perfect job, but I think I've done a good enough job in order to get the bike rolling (and maybe even MOT'd)

Wednesday, 4 January 2012

Is this home?

I've been saving this little bit of the story for a while - just in case it came to a complete conclusion.  It hasn't yet, but it still might.  However, even without a full conclusion (yet) I think it is still a story worth telling.

I've always been a bit miffed that I have no historical documentation or information for my scooter, but on the other hand I have rather enjoyed the process of trying to uncover the facts about my bike.  Initially I thought I might find a good lead through the still existing Manurhin Manufacturing organisation in France, but they so far have refused to answer any email I send them (surely there must be someone there who remembers 'Le bon vieux temps')  And I thought I might have found a little enthusiasm from a company with a proud historical pedigree like FN Midhurst whose forefathers were once UK concessionaires for Manurhin Scooters, but alas once again, not even an acknowledgement from them.
And so I started to lose hope in finding people who might be interested in a little historical probing.  Until that is, I started to look at repairing my seat pans.

Right from the beginning I was keen to see if I could get the engine up and running, and while I was working on this I stored all the body bits out of the way at the back of my shed.  Once the engine was running I started to turn my attention to other bits (Im not sure why the seat pans were important at this stage), and it wasn't until I dragged the leg-shield out of the dark that I noticed a little decal on the inside that for some reason I hadn't consciously seen when I was taking the bike apart


This looked to me to be perhaps a sticker placed on the bike by either a service mechanic or even a dealer.  Its Scottish address seemed to concur with my understanding of where the barn was that the scooter was discovered in by the chap I bought it from.

I wondered if Google might turn up anything on Doug Murray - and blow me! it did! :-)
I sent a speculative email to Murrays Motorcycles and had an immediate reply from Mr Gordon Murray


".......You have got the correct family but one generation on.   My dad is Doug Murray but he closed his motorcycle business in 1967 and went into selling cars.  Going by the address he must have sold that [my scooter] new or nearly new as he moved out of Hawkhill in 1962.   He is 83 now........ "

Over the course of a few emails, Gordon went on to explain that he was still in touch with the shop forman and he thought that the old shop sales ledgers still existed somewhere.  I was very excited.  I wondered if chassis numbers might have been recorded, in which case I could trace my scooter.
Sadly Gordon hasn't been able to find these ledgers (yet) but he sounded very interested to help so I still keep my fingers crossed.
In the meantime, Gordon sent me a photo of his dads shop in its day, along with a little bit of historical context;
Note the Vespa and the Scootacar (which still exists in Dundee!)

"......There were 2 main motorcycle shops in Dundee in the 50's and 60's.  Doug Murrays was the 2nd largest.   George MacLeans was the biggest and sold Triumph,Norton,BSA etc etc.   My dads shop had the 1st Honda & Yamaha franchise in Scotland.   There were also a couple of smaller workshops.  He was also the 1st Toyota/Daihatsu/Skoda car dealership in Scotland.  People say he was ahead of his time as these were unheard of makes at that time.   I remember that the Toyotas and Daihatsus had radios as standard which was not the norm.   The picture of the shop was taken sometime between '56 and '62 but I am not sure exactly when.    My dad always was one for the 'unusual'...... "

"Unusual"?  This convinces me more than ever that this is where my Manurhin was originally sold..... Now if only I could reach out and find the young Scottish laddie who bought it!